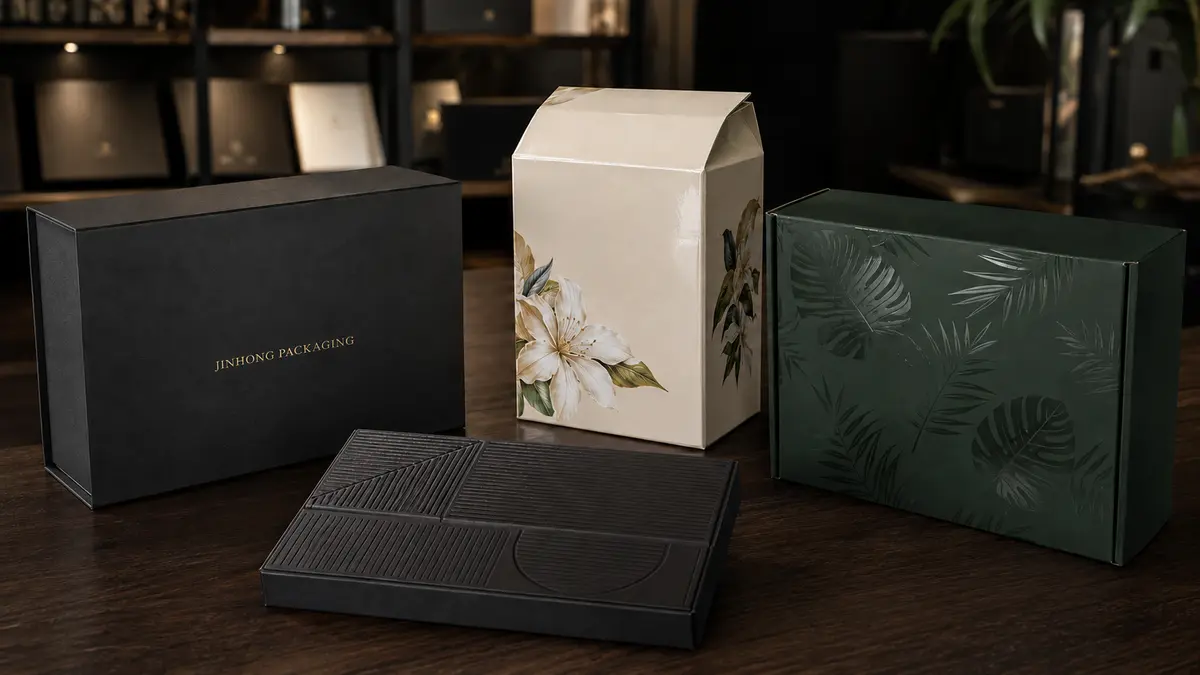
Los acabados de las cajas de embalaje influyen en el aspecto, el tacto y el rendimiento de una caja durante su manipulación. Pueden profundizar los colores impresos, crear contraste, resaltar un logotipo, proteger la superficie impresa o agregar un detalle táctil que los clientes asocian con la marca.
Sin embargo, el acabado más decorativo no siempre es la mejor elección. El acabado debe adaptarse al material de la caja, al método de impresión, a la categoría del producto, al entorno de distribución, a la cantidad del pedido y al presupuesto. Los colores oscuros pueden necesitar protección adicional contra raspaduras, los detalles de láminas finas pueden requerir un papel más suave y algunos recubrimientos pueden no ser apropiados para todas las aplicaciones de alimentos o reciclaje.
Esta guía compara diez acabados comunes de cajas de embalaje y explica su apariencia, beneficios prácticos, limitaciones y usos adecuados. También cubre papeles especiales, recortes de ventanas, preparación de archivos gráficos, muestreo y formas de combinar acabados sin hacer que el diseño sea innecesariamente complejo.
¿Qué es el acabado de una caja de embalaje?
El acabado de una caja de embalaje es un tratamiento superficial o proceso decorativo que se aplica después o junto con la impresión. Dependiendo del proceso, puede cubrir toda la superficie impresa o solo áreas seleccionadas.
Los acabados generalmente sirven para uno o más de estos propósitos:
- Proteger los gráficos impresos del roce, la humedad o la manipulación.
- Cambiar el brillo de la superficie o la sensación táctil
- Resaltar un logotipo, patrón o nombre de producto
- Crear contraste entre diferentes partes del diseño.
- Reforzar una presentación de marca premium o distintiva
- Mejorar la apariencia de colores y fotografías.
La laminación y los recubrimientos suelen cubrir áreas de superficie más grandes, mientras que el estampado con foil, el relieve, el bajorrelieve y el barniz UV selectivo a menudo se utilizan de forma selectiva.
No todos los acabados proporcionan el mismo tipo de protección. Por ejemplo, el estampado con foil es principalmente decorativo, mientras que la laminación puede agregar una película protectora sobre el papel impreso. El rendimiento completo de la caja aún depende del cartón, el papel, la tinta, el adhesivo, la estructura y el método de embalaje.
1. Laminación mate
La laminación mate aplica una fina película plástica sobre el papel impreso para crear una superficie suave y sin brillo. Se utiliza con frecuencia para cajas de cosméticos, cajas de regalo, embalajes de productos electrónicos, embalajes de prendas de vestir y cajas de cartón premium para venta minorista.
Ventajas de la laminación mate
- Crea una apariencia sobria y moderna
- Reduce los reflejos bajo iluminación comercial y fotográfica.
- Proporciona protección de superficie para gráficos impresos.
- Funciona bien con estampado con foil y barniz UV selectivo
- Puede suavizar la apariencia de colores fuertes u oscuros.
La laminación mate suele seleccionarse cuando una marca desea una presentación visual limpia sin una superficie altamente reflectante.
Puntos a considerar
La película mate estándar puede mostrar huellas dactilares, roces o rayones, particularmente en áreas grandes de negro, azul marino, verde intenso u otros colores oscuros. La película antirayaduras o resistente a los arañazos puede ser más adecuada cuando el embalaje vaya a ser manipulado con frecuencia.
Los colores también pueden aparecer ligeramente menos saturados bajo una película mate que bajo una superficie brillante. Las pruebas impresas y las muestras de producción ayudan a determinar si este efecto respalda el diseño previsto.
La laminación agrega otra capa de material a la caja. Las marcas con requisitos de reciclabilidad deben confirmar el tipo de película, las condiciones de recolección locales y la construcción completa del empaque en lugar de asumir que cada caja de papel laminada sigue el mismo camino de eliminación.
2. Laminación brillante
La laminación brillante crea una superficie lisa y reflectante que puede hacer que los colores y las imágenes fotográficas parezcan más vívidos.
Se utiliza comúnmente para:
- Cajas de venta al por menor con gráficos coloridos
- Embalajes de juguetes y juegos
- Cajas promocionales
- Embalajes de cuidado personal
- Cajas exteriores relacionadas con alimentos cuando la construcción seleccionada sea apropiada
Ventajas de la laminación brillante
- Produce colores brillantes y saturados
- Crea una superficie limpia y pulida
- Proporciona protección contra manipulación general y salpicaduras leves.
- Puede hacer que las fotografías e ilustraciones parezcan más nítidas
- Suele ser más fácil de limpiar que el papel sin estucar
Puntos a considerar
La superficie reflectante puede crear reflejos, lo que hace que el texto pequeño sea más difícil de leer bajo una iluminación intensa. También pueden ser visibles huellas dactilares y marcas superficiales.
La laminación brillante no debe describirse automáticamente como el mejor acabado para el envasado de alimentos. La idoneidad depende de si la caja entra en contacto directa o indirectamente con los alimentos, el sustrato, las tintas, los adhesivos, los recubrimientos, las barreras, las condiciones del producto y las regulaciones aplicables.
Para proyectos relacionados con alimentos, todos los materiales y áreas impresas deben evaluarse de acuerdo con el producto previsto y el uso del embalaje. Un acabado exterior decorativo no reemplaza la necesidad de una capa o paquete interior apropiado para el contacto con los alimentos.
3. Laminación antirrayaduras
La laminación antirrayaduras está diseñada para reducir los rayones y roces visibles en comparación con la película mate estándar. Es especialmente útil para envases oscuros, donde las pequeñas marcas pueden ser muy visibles.
Las aplicaciones adecuadas incluyen:
- Cajas de cosméticos negras
- Cajas de regalo rígidas de color oscuro
- Embalaje de productos electrónicos
- Cajas de presentación
- Embalajes que se manipularán repetidamente en el comercio minorista
Ventajas de la laminación antirrayaduras
- Ayuda a mantener una superficie más limpia durante el manejo.
- Reduce la visibilidad de rayones leves
- Admite grandes áreas de color oscuro o sólido
- Puede mejorar la apariencia del embalaje después del envío y el montaje.
Puntos a considerar
La película antirrayaduras suele costar más que la laminación mate estándar. Es resistente al roce normal, pero no debe considerarse completamente resistente a los arañazos.
El resultado puede variar entre películas y proveedores. Las marcas deben comparar muestras físicas y probar la película seleccionada con el color impreso real, especialmente cuando los estándares de apariencia son estrictos.
Es posible que aún se requieran pañuelos protectores, fundas, divisores o envoltorios individuales para cajas rígidas completamente ensambladas. La laminación por sí sola no puede evitar que se aplasten las esquinas, las abolladuras o la fricción entre las cajas dentro de una caja de envío.
4. Laminación suave al tacto
La laminación suave al tacto crea una superficie lisa y aterciopelada. Se selecciona principalmente para la presentación táctil en lugar de alto brillo o fuerte contraste visual.
Los usos comunes incluyen:
- Cajas de cosméticos y cuidado de la piel
- Envases de perfumes
- Joyeros
- Embalaje de productos electrónicos de primera calidad
- Invitaciones y kits de presentación
- Cajas de regalo de lujo
Ventajas de la laminación suave al tacto
- Crea una experiencia táctil distintiva
- Produce una apariencia de bajo brillo
- Funciona con estampado con foil, relieve y efectos de brillo selectivos
- Puede hacer que los diseños gráficos simples parezcan más refinadas
Puntos a considerar
Las superficies suaves al tacto pueden mostrar huellas dactilares, polvo, aceite, frotamiento o marcas de presión según la película y el color del embalaje. También pueden requerir un manejo más cuidadoso durante el montaje y embalaje.
El efecto táctil debe evaluarse con una muestra física porque no se puede evaluar con precisión a partir de una representación digital.
Las marcas también deben confirmar si el costo adicional crea un valor significativo para el cliente. Es posible que la laminación suave al tacto no sea necesaria para cajas de gran volumen, cajas promocionales de uso breve o embalajes cuya superficie estará cubierta por una funda de envío.
5. Barnices acuosos y UV
Los recubrimientos son acabados líquidos que se aplican al papel impreso y se curan o secan para crear una superficie protectora o decorativa. A diferencia de la laminación con película, no añaden una película plástica independiente.
Los tipos de recubrimiento comunes incluyen:
- Barniz acuoso
- Barniz brillante o mate
- Recubrimiento UV en toda la superficie
- Recubrimientos funcionales o de barrera especiales
La formulación exacta y el rendimiento varían, por lo que el término "recubrimiento" no debe tratarse como una especificación universal.
Barniz acuoso
El barniz acuoso es a base de agua y comúnmente se aplica sobre cartones impresos para proteger la tinta y mejorar la consistencia de la superficie. Puede producirse en apariencia brillante, satinada o mate, según la formulación.
Las ventajas potenciales incluyen:
- Rápida aplicación durante algunos procesos de impresión.
- Protección general contra el roce
- Un tratamiento superficial más ligero que la laminación con película.
- Diferentes opciones de brillo
El barniz acuoso no hace que una caja de papel sea impermeable. La resistencia a la humedad, la grasa y la abrasión depende de la química del recubrimiento, la cobertura, el papel y el uso previsto.
Barniz UV de cobertura total
El recubrimiento UV se cura con luz ultravioleta y puede crear una superficie de alto brillo y apariencia duradera. Puede aplicarse en toda el área impresa o de forma selectiva.
El barniz UV de cobertura total pueden realzar los colores y proporcionar un brillo visual intenso, pero pueden agrietarse o volverse menos atractivos alrededor de los pliegues si el material, el espesor del revestimiento o los hendidos no están coordinados adecuadamente.
Puntos a considerar
El rendimiento del recubrimiento debe revisarse junto con:
- Absorbencia del papel y textura de la superficie.
- Compatibilidad de tinta
- Requisitos de hendido y plegado
- Áreas de pegamento
- Requisitos de contacto con productos y alimentos
- Objetivos de reciclaje
- Exposición prevista a la humedad, el calor, la grasa o el frío.
Es posible que el pegamento no se adhiera de manera confiable sobre algunas superficies revestidas. Por lo tanto, es posible que sea necesario reservar áreas sin pegamento en el diseño o en las especificaciones de producción.
6. barniz UV selectivo
barniz UV selectivo aplica un recubrimiento curado brillante solo a partes seleccionadas de la superficie impresa. A menudo se combina con un fondo mate para crear un contraste visible y táctil.
barniz UV selectivo puede resaltar:
- Logotipos
- Nombres de productos
- Patrones
- Ilustraciones
- Fronteras
- Texturas de fondo
Una caja mate oscura con un patrón UV selectivo sutil y claro puede generar interés sin introducir otro color impreso.
Ventajas del barniz UV selectivo
- Crea contraste entre áreas mate y brillantes.
- Destaca elementos de diseño seleccionados
- Agrega un efecto táctil ligeramente elevado
- Funciona bien con una marca sobria
- Puede combinarse con foil o estampado cuando sea técnicamente adecuado
Puntos a considerar
Las líneas muy finas, el texto pequeño y el registro cercano pueden resultar difíciles de reproducir de manera consistente. El diseño debe permitir tolerancias de producción entre el diseño impreso y la capa barniz UV selectivo.
barniz UV selectivo no está destinado a proteger toda la caja cuando cubre solo áreas seleccionadas. El fondo sin recubrir o laminado mate sigue determinando la mayor parte del rendimiento de la superficie.
Una cobertura intensa puede aumentar el costo y hacer que el diseño parezca visualmente recargado. Los rayos UV selectivoes suelen ser más eficaces cuando resaltan un número limitado de elementos.
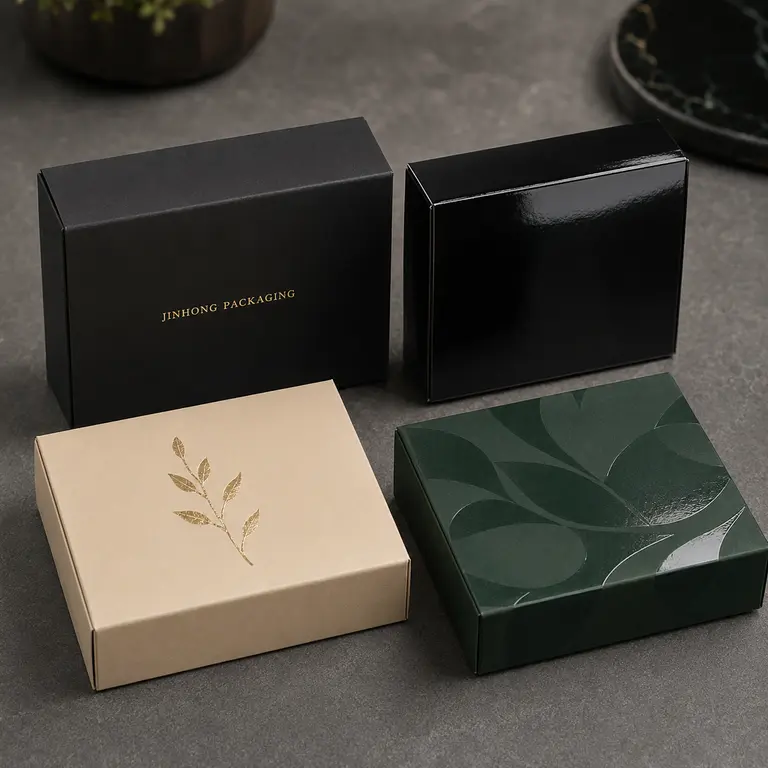
7. Estampado con foil
El estampado con lámina transfiere una lámina metálica, pigmentada, mate u holográfica a áreas seleccionadas mediante un troquel, calor y presión.
Las opciones de láminas comunes incluyen:
- Oro
- Plata
- Cobre
- Oro rosa
- Lámina metálica de colores
- Lámina de pigmento mate
- Lámina holográfica
El estampado con foil se utiliza a menudo para logotipos, marcas, bordes, nombres de colecciones y pequeños detalles decorativos.
Ventajas del estampado con foil
- Crea un efecto de color reflectante o distintivo
- Agrega contraste sin imprimir un área gráfica grande
- Funciona con muchos papeles estucados, no estucados y especiales
- Puede combinarse con relieve para lograr un efecto de lámina en relieve
- Ayuda a establecer un punto focal en un diseño sobrio
Puntos a considerar
Los resultados del laminado dependen de la textura del papel, la calidad del troquel, la presión de estampado, la temperatura, la cobertura y los detalles del diseño. Es posible que los papeles rugosos o de textura profunda no produzcan los mismos bordes limpios que las superficies más lisas.
Las áreas grandes de lámina sólida pueden mostrar inconsistencias y pueden requerir pruebas adicionales. El texto extremadamente fino, los espacios estrechos y las líneas finas pueden rellenar o perder definición.
El color de la lámina debe aprobarse utilizando una muestra física o una muestra de lámina. Los efectos metálicos que se muestran en la pantalla de una computadora no representan con precisión el reflejo, el tono o el rendimiento en el papel seleccionado.
8. Relieve
El relieve utiliza un juego de troqueles combinados para elevar áreas seleccionadas por encima de la superficie del papel circundante. Crea un efecto tridimensional que se puede ver y sentir.
El relieve se aplica comúnmente a:
- Logotipos
- Nombres de marcas
- Monogramas
- Fronteras
- Patrones
- Nombres de productos
- Pequeños elementos decorativos
Relieve sin impresión
El relieve sin impresión crea una impresión elevada sin añadir tinta ni foil. Produce un efecto sutil que funciona particularmente bien en papeles no estucados, coloreados o texturizados.
Debido a que el efecto depende de la luz y la sombra, el diseño debe ser lo suficientemente grande y claro para permanecer visible en el material seleccionado.
Relieve con registro
El relieve con registro alinea el área elevada con impresión o estampado con foil. Esto puede crear un fuerte efecto visual pero requiere un registro más preciso y herramientas adicionales.
Puntos a considerar
La profundidad y la definición finales dependen de:
- Grosor y flexibilidad del papel
- Textura de la superficie
- Tamaño y complejidad del archivo gráfico.
- Construcción de matrices
- Presión
- Posición relativa a pliegues y bordes.
- Estructura de caja debajo del área en relieve
Es posible que el texto muy pequeño y los detalles intrincados no se graben con claridad. El relieve profundo también puede estirar, agrietar o distorsionar algunas superficies impresas o laminadas.
El relieve no debe colocarse demasiado cerca de un pliegue, línea de corte, imán, ventana o borde estructural sin revisar las limitaciones de producción.
9. Bajorrelieve
El bajorrelieve presiona un diseño debajo de la superficie del papel circundante. Crea una impresión empotrada y, a menudo, proporciona un efecto visual más silencioso que los acabados laminados o de alto brillo.
El bajorrelieve es adecuado para:
- Identidad gráfica minimalista
- Logotipos en papel no estucado
- Cajas de papelería premium
- Embalaje natural o discreto
- Mensajes en la tapa interior
- Patrones repetidos
Ventajas del bajorrelieve
- Agrega detalles táctiles sin otro color impreso
- Crea una apariencia premium discreta
- Puede funcionar bien en papeles gruesos o texturizados
- Puede combinarse con estampado con foil
- Admite diseños limpios y minimalistas
Puntos a considerar
Es posible que una impresión superficial no sea visible en papel con mucha textura, mientras que una profundidad excesiva puede distorsionar el reverso o afectar el tablero envuelto debajo de él.
La apariencia también cambia con la iluminación. Una maqueta digital puede exagerar la profundidad, por lo que el muestreo físico es importante.
A veces se confunden el relieve y el bajorrelieve. El relieve realza el diseño seleccionado; El bajorrelieve lo presiona hacia adentro. Ambos requieren herramientas dedicadas y generalmente agregan costos de instalación.
10. Papeles texturizados y especiales
Un efecto decorativo no siempre requiere un recubrimiento adicional o un proceso de posimpresión. El papel en sí puede proporcionar color, textura, brillo o carácter táctil.
Las opciones de papel especial pueden incluir:
- Papel con textura de lino
- Papel marcado con fieltro
- Papel nacarado
- Papel metálico
- Papel teñido
- Papel kraft
- Papel estampado
- Papeles con fibras naturales o inclusiones visibles
Los papeles especiales se utilizan habitualmente para envolver cajas rígidas o crear fundas, cajas plegables, etiquetas y paneles interiores.
Ventajas de los papeles especiales
- Crear interés táctil sin cubrir toda la superficie con película
- Aportar color y textura antes de imprimir.
- Admitir diseños discretos o basados en materiales
- Reducir potencialmente la necesidad de múltiples procesos decorativos
- Ayudar a diferenciar el embalaje a través del tacto.
Puntos a considerar
La textura del papel puede afectar la cobertura de la tinta, la nitidez de impresión, la definición del relieve, el rendimiento del adhesivo y la consistencia del color.
Los papeles no estucados y texturizados absorben la tinta de forma diferente que los papeles estucados. Los gráficos y fotografías finos pueden parecer más suaves, mientras que las áreas grandes de tinta sólida pueden mostrar más variación.
Algunos papeles especiales están disponibles solo en tamaños de hoja, colores, pesos o cantidades mínimas específicos. La disponibilidad del material debe confirmarse antes de finalizar la estructura de la caja y el arte.
Las marcas interesadas en papel certificado deben verificar el material exacto y la documentación requerida. La certificación FSC se relaciona con el manejo forestal responsable y la cadena de custodia; no determina automáticamente la reciclabilidad o el impacto ambiental de la caja terminada completa. Más información está disponible en el Consejo de Manejo Forestal.
¿Es el recorte de una ventana un acabado de embalaje?
El recorte de una ventana se describe más exactamente como una característica estructural que como un acabado superficial. Crea una apertura que permite a los clientes ver el producto dentro de la caja.
Se puede agregar una película transparente detrás de la abertura para proteger el producto, aunque también son posibles diseños de ventana abierta para aplicaciones adecuadas.
Las cajas con ventana se utilizan a menudo para:
- Alimentación y repostería
- Cosméticos
- Velas
- Juguetes
- Productos de regalo
- Accesorios al por menor
Beneficios de una ventana
- Muestra el producto real
- Ayuda a los clientes a confirmar el color, el tamaño o la forma
- Crea un punto focal visual
- Reduce la necesidad de una fotografía de producto impresa de gran tamaño
Puntos a considerar
La posición de la ventana puede reducir la resistencia estructural del panel. Las aberturas grandes, los bordes estrechos y las ventanas cerca de los pliegues pueden requerir soporte adicional.
Durante el desarrollo se deben revisar la forma de la ventana, el material de la película, el adhesivo, el movimiento del producto, la protección contra el polvo y los objetivos de reciclaje. Una ventana de plástico también crea una construcción de materiales mixtos a menos que se pueda separar.
Para productos relacionados con alimentos, es posible que el producto visible aún necesite un empaque primario adecuado. No se debe asumir que la caja de ventana exterior por sí sola proporciona la barrera requerida o la protección contra el contacto con los alimentos.
Cómo elegir el acabado de caja de embalaje adecuado
El mejor acabado depende del proyecto completo y no sólo de la apariencia.
Considere el material de la caja
El papel estucado, el papel no estucado, el papel kraft, el papel especial y el papel de regalo impreso responden de manera diferente a la laminación, los revestimientos, el foil, el estampado y los adhesivos.
Un acabado que funciona bien en papel estucado liso puede producir un resultado menos preciso en una superficie con textura fuerte.
Considere la estructura de la caja
Las cajas plegables tienen arrugas, áreas de pegamento y requisitos de ensamblaje de alta velocidad. Las cajas rígidas pueden utilizar cartón envuelto, cierres magnéticos, tapas separadas y más montaje manual.
El acabado debe adaptarse a pliegues, bordes, bisagras, puntos de pegamento, imanes y otras características estructurales.
Explora nuestro cajas de embalaje para comparar estructuras de cajas comunes y opciones de personalización.
Considere el producto y el canal de distribución
Los productos de cosméticos, café, joyería, alimentos, electrónica y comercio electrónico tienen diferentes requisitos de presentación y manipulación.
El empaque exhibido en una tienda minorista puede priorizar la apariencia en los estantes, mientras que el empaque del comercio electrónico también debe resistir el cumplimiento y la entrega de paquetes. Una caja decorativa para venta minorista puede necesitar una caja de envío y material protector por separado.
Considere el estilo de la marca
Un resultado premium no requiere todos los acabados disponibles. Una combinación simple, como papel texturizado con bajorrelieve ciego o laminación mate con foil restringido, puede crear una identidad más fuerte que varios efectos en competencia.
El acabado debe respaldar la tipografía, la paleta de colores, el posicionamiento del producto y la experiencia del cliente.
Considere el presupuesto y la cantidad del pedido
El estampado con foil, el relieve, el bajorrelieve y los efectos registrados generalmente requieren herramientas y configuración dedicadas. El costo por caja generalmente cambia con:
- Cantidad de pedido
- Área de cobertura
- Número de matrices o colores
- Complejidad del arte
- Requisitos de registro
- Disponibilidad de materiales y acabados
- Tipo de muestra
- Requisitos de montaje manual
Cuando el presupuesto es limitado, priorice el acabado en la superficie más visible de cara al cliente en lugar de aplicar varios efectos en cada panel.
Para obtener más información sobre los factores que influyen en los precios, lea nuestra guía para costo de embalaje personalizado.
Combinación de múltiples acabados de cajas de embalaje
Se pueden combinar múltiples acabados, pero más procesos no producen automáticamente mejores envases.
Las combinaciones efectivas incluyen:
- Laminación mate con barniz UV selectivo selectivo
- Laminación mate con estampado discreto
- Papel texturizado con relieve ciego
- Papel de color sin estucar con bajorrelieve
- Estampado en lámina con relieve registrado
- Laminación antirrayaduras con un pequeño logotipo metálico
Cada proceso adicional puede aumentar la configuración, las herramientas, los requisitos de registro, el tiempo de producción y los costos. La combinación de efectos también crea más oportunidades de variación.
Antes de utilizar varios acabados, identifique el punto focal visual principal. Si el logotipo está estampado en foil, bajorrelieve en relieve, rodeado de barniz UV selectivo y colocado sobre papel con mucha textura, los efectos pueden competir en lugar de reforzarse entre sí.
Una muestra controlada es especialmente importante cuando se deben alinear dos o más procesos de acabado.
Preparación de archivos gráficos para acabados de embalaje
El acabado artístico debe prepararse por separado del diseño impreso principal.
Un archivo típico puede incluir capas individuales para:
- Troquelado y hendido
- Gráficos impresos
- Tinta blanca
- Estampado con foil
- Estampado
- Bajorrelieve
- Punto UV
- Recorte de ventana
- Áreas sin pegamento
Cada capa de acabado debe utilizar un color directo con un nombre claro y no debe mezclarse con el archivo gráfico CMYK impresa.
Utilice archivos vectoriales
Los logotipos, áreas de láminas, relieves, bajorrelieves y elementos barniz UV selectivo generalmente deben suministrarse como ilustraciones vectoriales. Las imágenes rasterizadas pueden crear bordes irregulares o dificultar la preparación del troquel.
Confirmar requisitos mínimos de detalle
Es posible que el texto extremadamente pequeño, las líneas finas, los espacios estrechos y los patrones complejos no se reproduzcan con precisión. Los requisitos mínimos dependen del proceso, material, equipo y socio de producción.
El diseño artístico debe revisarse antes de preparar las herramientas.
Permitir tolerancia de registro
Los gráficos impresos y los acabados selectivos pueden variar ligeramente durante la producción. Los diseños que requieren una alineación exacta deben permitir tolerancias de registro realistas.
Mantenga los acabados alejados de áreas críticas
Es posible que los acabados laminados, UV, estampados y otros acabados necesiten autorización de:
- Cortar los bordes
- Líneas de plegado
- Áreas de pegamento
- Componentes magnéticos
- Ventanas
- Perforaciones
- Códigos de barras
- Texto legal muy pequeño
El espacio libre requerido debe confirmarse según la estructura de la caja y el método de acabado.
Para obtener una explicación más amplia de los procesos de impresión y las consideraciones artísticas, consulte nuestra guía para métodos de impresión de envases personalizados.
Por qué son importantes las muestras físicas
Las representaciones por computadora pueden mostrar la ubicación prevista de un acabado, pero no pueden reproducir con precisión la textura, el reflejo, el color de la lámina, la profundidad del relieve o la sensación táctil.
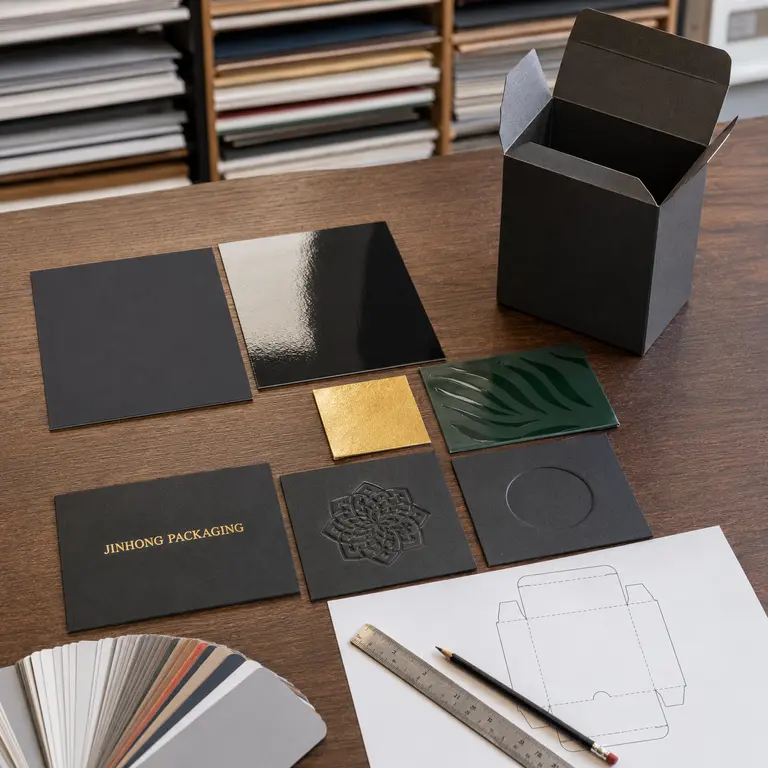
Una muestra física puede ayudar a evaluar:
- Brillo superficial
- Cambios de color después de la laminación o recubrimiento
- Color de lámina y cobertura
- Profundidad de relieve o bajorrelieve
- Registro UV selectivo
- Visibilidad de huellas dactilares y marcas
- Rendimiento de plegado y plegado
- Adhesión del pegamento
- Presentación general de la caja
No todos los tipos de muestras utilizan los mismos materiales, equipos o herramientas que la producción en masa. Antes de aprobar una muestra, confirme qué elementos representan la especificación de producción final y cuáles son solo aproximaciones estructurales o visuales.
Errores comunes en el acabado del embalaje
Seleccionar un acabado únicamente de una maqueta digital
Los efectos de lámina metálica, brillo, textura y relieve que se muestran en una pantalla pueden verse diferentes a los de la producción física. Revisar muestras de materiales o referencias terminadas siempre que sea posible.
Usar demasiados procesos decorativos
Varios acabados en un panel pueden hacer que el diseño sea visualmente abarrotado. Seleccione un efecto principal y utilice los detalles de apoyo de forma selectiva.
Ignorar las rozaduras en colores oscuros
Las áreas impresas grandes en negro u oscuro pueden revelar roces, huellas dactilares y rayones. Compare las opciones estándar mate, antirrayaduras y de tacto suave antes de la aprobación.
Colocar detalles finos en papel rugoso
La textura fuerte del papel puede interrumpir el foil, el texto pequeño y las líneas finas. Simplifique el archivo gráfico o seleccione un material más suave si los detalles nítidos son importantes.
Olvidar pliegues y áreas de pegamento
Algunos recubrimientos y películas pueden agrietarse en los pliegues o interferir con la unión adhesiva. Las especificaciones de línea de troquelado y acabado deben identificar estas áreas antes de la producción.
Hacer afirmaciones medioambientales amplias
Términos como “ecológico”, “verde” y “totalmente sostenible” pueden resultar engañosos sin evidencia y calificaciones claras.
Las declaraciones ambientales deben identificar el material específico, el contenido certificado, el contenido reciclado o la vía de eliminación y considerar la construcción completa de la caja. Las empresas que venden en los Estados Unidos pueden consultar la Comisión Federal de Comercio. Guías Verdes.
Acabados de embalaje para diferentes categorías de productos
Cajas de cosméticos y cuidado de la piel
Los envases de cosméticos son mate, antirayaduras, suaves al tacto, laminados, en relieve y barniz UV selectivo. La superficie elegida debe tolerar el llenado, el cumplimiento, la manipulación minorista y el posible contacto con residuos del producto.
Explora nuestro cajas de cosméticos personalizadas para opciones adicionales de estructura y materiales.
Cajas de regalo y joyería
Las cajas rígidas envueltas con papel texturizado, estampado en foil, relieve sin impresión o bajorrelieve en relieve pueden crear una presentación táctil. Es posible que se requiera una envoltura protectora para evitar el roce durante el transporte.
Cajas para café y alimentos
Los cartones impresos para juegos de regalo de café, confitería y alimentos pueden utilizar recubrimientos o laminación para mejorar el rendimiento visual y de manipulación. La idoneidad de cada material debe confirmarse según su función en contacto directo o indirecto con los alimentos y el paquete completo.
Comercio electrónico y cajas de envío
Las cajas postales suelen priorizar la impresión duradera y el rendimiento del transporte. Un acabado decorativo no debe debilitar los pliegues, interferir con la cinta o las etiquetas, ni reemplazar la necesidad de una protección adecuada para el envío.
Preguntas frecuentes sobre los acabados de las cajas de embalaje
¿Cuál es la diferencia entre laminación y recubrimiento?
La laminación aplica una película separada sobre la superficie impresa. Se aplica un recubrimiento en forma líquida y luego se seca o cura. Su apariencia, protección, costo, consideraciones de reciclabilidad y compatibilidad dependen del material y proceso específicos.
¿Qué acabado de embalaje parece más premium?
No existe un acabado único de primera calidad. El estampado, el estampado, el bajorrelieve, la laminación suave al tacto y el papel especial pueden crear una apariencia refinada cuando se usan adecuadamente. La calidad del diseño, la selección de materiales, las proporciones y la coherencia de la producción son igualmente importantes.
¿Se pueden combinar varios acabados?
Sí. Las combinaciones comunes incluyen laminación mate con barniz UV selectivo, estampado en lámina con relieve y papel texturizado con bajorrelieve ciego. Cada proceso adicional debe tener un propósito claro y se debe probar su compatibilidad y registro.
¿Cuál es el mejor acabado para envases oscuros?
La laminación antirrayaduras a menudo se considera para superficies impresas oscuras porque puede reducir el roce visible en comparación con la película mate estándar. Sin embargo, los resultados varían y se deben evaluar muestras físicas. Es posible que aún sea necesario un envoltorio protector.
¿La laminación brillante es adecuada para envases de alimentos?
Puede ser adecuado para algunos cartones exteriores relacionados con alimentos, pero la decisión depende de la construcción completa del embalaje, el contacto previsto, las condiciones del producto, los materiales, las tintas, los adhesivos y los requisitos aplicables. La laminación brillante por sí sola no hace que una caja sea apta para alimentos ni proporciona todas las barreras necesarias.
¿El estampado con foil aumenta el costo del embalaje?
Sí. El estampado con foil normalmente requiere un troquel, una configuración, material de lámina y un proceso de producción adicional. El costo depende del tamaño del diseño, la cobertura, el tipo de lámina, la cantidad de posiciones de estampado, la cantidad del pedido y los requisitos de registro.
¿Cuál es la diferencia entre gofrado y bajorrelieve?
El estampado eleva el diseño por encima de la superficie del papel. El bajorrelieve presiona el diseño debajo de la superficie circundante. Ambos añaden detalles táctiles y requieren ilustraciones y herramientas adecuadas.
¿Se pueden utilizar acabados de embalaje para pedidos pequeños?
Es posible que algunos acabados estén disponibles para pedidos más pequeños, pero las herramientas y la configuración dedicadas pueden hacer que el costo unitario sea relativamente alto. La disponibilidad y la cantidad mínima dependen de la estructura de la caja, el método de impresión, el acabado y el socio de producción seleccionado.
¿Necesito una muestra física?
Se recomienda encarecidamente una muestra física cuando el color, la textura, el foil, el relieve, la radiación UV selectivo, el ajuste o el rendimiento de la superficie son importantes. Las maquetas digitales no pueden representar completamente estas características.
Conclusiones
Los acabados de las cajas de embalaje pueden proteger las superficies impresas, crear interés táctil, enfatizar la marca y mejorar la presentación del producto. La elección correcta depende del material, la estructura, el diseño, el producto, las condiciones de manipulación, el presupuesto y el método de producción.
En lugar de aplicar varios efectos automáticamente, identifique el detalle más importante de cara al cliente y seleccione un acabado que lo respalde. Los materiales físicos, la revisión del arte y el muestreo adecuado ayudan a confirmar si el resultado final cumple con los requisitos visuales y prácticos.
Jinhong Packaging respalda el abastecimiento de cajas y materiales, la comparación de acabados, la coordinación de muestras, el seguimiento de la producción y la preparación de envíos a través de socios de fabricación seleccionados. Las recomendaciones se desarrollan según los requerimientos de cada proyecto de packaging.